Showing posts with label white. Show all posts

Tuesday, January 29, 2013

January Untrieds

Hello again! Since I posted Darling Diva Polish yesterday, technically the other one I swatched at the same time is a lonely untried ;) So here we go with Princess Celestia:


This is one coat of Princess Celestia over white undies. Princess Celestia has blue, pink, and purple glitters and yellow flowers. Obviously the flowers drew me in! I really love the look of this, I'd probably do another coat next time so I could get the glitters spread out more like they are on my ring finger, but it's beautiful regardless. I highly recommend Darling Diva Polish - she's such a sweetheart and her products have never let me down!

So there's my untried for the day, head on over to the other Amanda's blog to see what she's got for us!

xoxo,
Amanda

Tuesday, December 18, 2012

Candy Lacquer Modern Love & Rarity

Blaaaaaaaahhhhhhhhhhhhhhhhhh hi. I don't have any energy to blog lately so I tend to do like 10 posts all at once and schedule them. I'm determined to be on schedule for the Glitter Challenge with Amanda and Madeline!

I ordered some Candy Lacquers back in the day and my bottle of Modern Love had a funky formula. Just really thick and no glitter came out... so I emailed Sandra and she offered to refund me or send me another polish while she reformulated it. I really just wanted ML, so I asked if she'd just send me a reformulated bottle, which she did, plus a bonus bottle of my choice! Now THAT'S customer service. I know I've said this a bazillion times, but Candy Lacquer is one of my top 3 favorite indie brands, right up there with Lynnderella.  SO ANYWAY.

This is the reformulated Modern Love over Orly Decades of Dysfunction. As you can see, it was awesomesauce. But then again, I love heart glitter. I HEART heart glitter, as a matter of fact!


Rarity is the polish I chose as my freebie and, let me tell you, it was so hard to narrow down but this was a great choice! I'll be honest and tell you I have no idea what this base is because I spilled acetone on my notepad specifying it, but I'm willing to say probably Essie French Affair? Sorry about that.


What do you think? I'm pretty satisfied with my choices, if I do say so myself!

xoxo,
Amanda

Saturday, December 1, 2012

Lazy 15: Bonfire Night

Happy December! I'm sorry I failed at this challenge so much, I've just been so lazy. So so so lazy.


I was a little uninspired for bonfire night but a conversation early on with some of the creators of this challenge gave me an epic idea: bonfires + nights = okay. But bonfires + nights + S'MORES = FUN. So these are my S'mores nails.


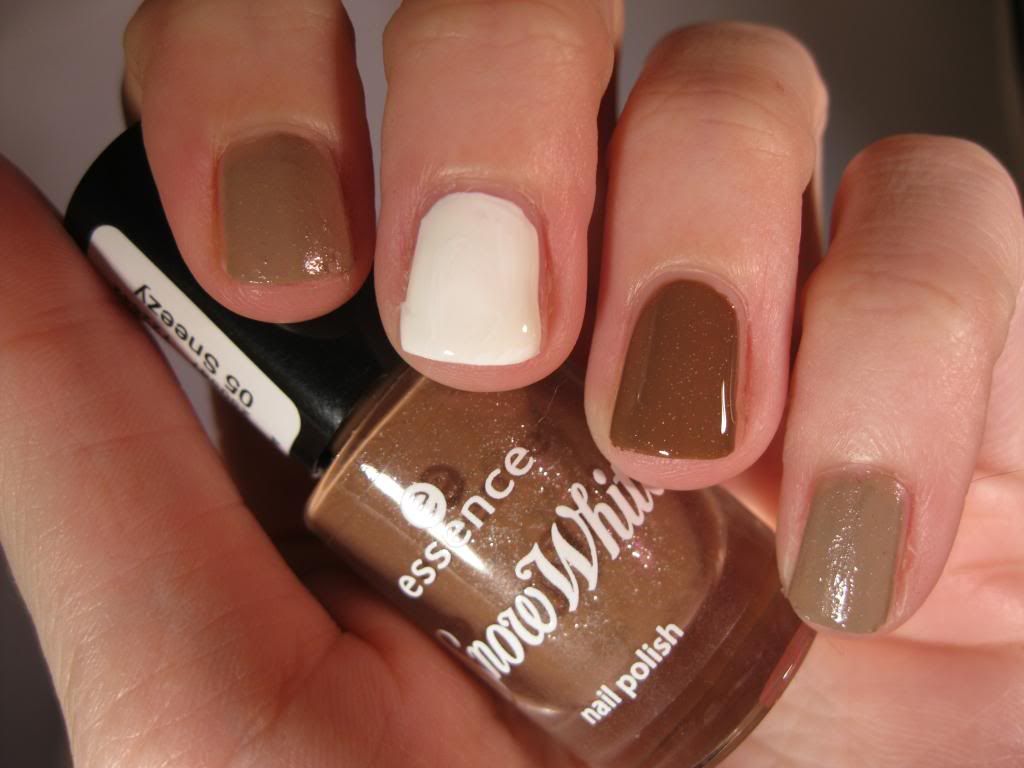
My nails are the pieces of a s'more: graham crackers on pointer and pinky, marshmallow on middle, and chocolate on ring. The marshmallow is Essie Marshmallow, chocolate is Essence Sneezy, and I only have one brown polish in my entire collection (you can see it right in that photo) so I actually had to Franken another polish for the graham crackers. It's Sneezy with one drop white and one drop fall orange Migi.

There you have it, belated challenge mani!

xoxo,
Amanda

Monday, November 19, 2012

Lazy 15: Dessert

Hey everyone - another Monday is upon us! However, for my fellow Americans, it'll be a short week for us because of Thanksgiving on Thursday. I'm out early on Wednesday and then off the rest of the week, so I'm definitely looking forward to some quality time off. I'm going to be doing Thanksgiving with my dad, boyfriend, and boyfriend's mom this year and I'm pretty excited for good food and our families to mix and match ;)


The challenge for today is dessert nails. My first thought, and probably many of yours, was cupcakes, but I worried they'd be overdone. I decided to go for a cookie theme: sugar cookies with sprinkles! Every year for Christmas, I make sugar cookies and I can never resist leaving some without frosting and just adding sprinkles to them before they bake, so that was my inspiration.

For the nails themselves, I used a basic white, then Smitten Polish Confection, and topped with Orly Winter Wonderland. They kind of look like if sugar cookies and snickerdoodles mated, but that's okay. I'd still eat a cookie if it looked like this ;)


Smitten Polish is quickly becoming one of my favorites: this one was a white jelly base with rainbow glitter and it was really pretty and easy to work with. I just bought another one recently with pink and purple glitter in a white jelly base and it looks like pop tarts! Here's Confection on its own, in case you were wondering :)


 Anyway, that's all for today, go check out my fellow challengers!


xoxo,
Amanda

Thursday, November 15, 2012

November Untrieds Part 5

Hello! Almost the end of the week yayyyy! I'm actually off work tomorrow because tonight I'm seeing Bassnectar with my boyfriend. When we started dating, I took an interest in his musical tastes, of course, and Bassnectar is probably my favorite of all his music he introduced me to - so I'm pretty excited! I'm DEFINITELY excited for having tomorrow off. I used to have all Fridays off work but had to work them to make more money, so having one off now feels like a real treat!

ANYWAAAYYYYY... today's pictures are awful. Maybe my battery was dying or maybe I was lazy or maybe my life malfunctioned? I don't know. But it's not the best photography ever so forgive me. I needed to do my next day of mine and Madeline's challenge and apparently I overlooked that my photos SUCK. ... uh. Ahem. Moving on.

China Glaze Jungle Queen was actually an accidental purchase for me. I found it on clearance at Sally's and thought it was Elephant Walk... which, of course, it wasn't. So I grinned (grun?) and beared (bore?) it and tried it anyway. I don't love it, don't hate it. It's a dusty purple with shimmer (ughhhh I hate shimmer) but it looks gray in some lights. This was two coats and it applied well.


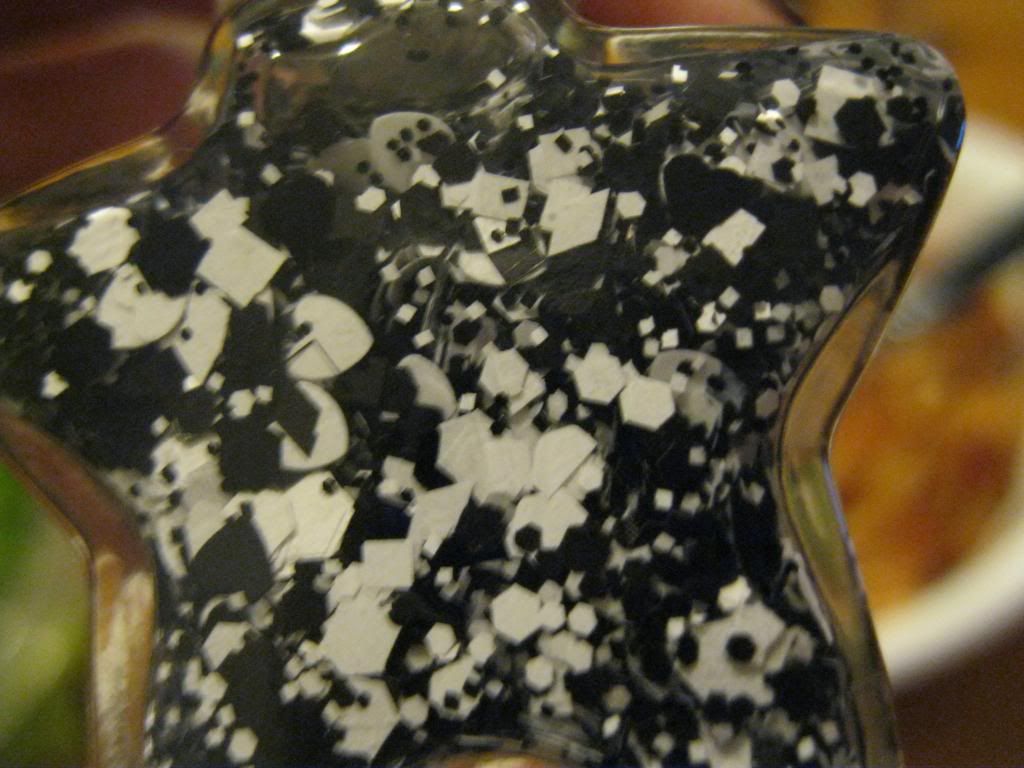
Then I added a coat of JENsations Follow Your Heart. This is black and white matte glitters (including hearts, eeeee!) in a clear base. If you're running to Jen's shop now to buy it, you're going to be disappointed - because this was a custom one made for me! However, everything used was a combination of glitters from her other polishes, so if you're lemming it you could probably request "Follow Your Heart" or just do what I did and tell her you want a custom polish with all the matte black and white glitters she has except bar glitter. :)


Here's a bottle shot of Follow Your Heart. I absolutely LOVE this polish. Jen did a great job (by the way, custom polishes by Jen are $9.20 - the .20 is to cover a listing fee - and she's so quick and dynamic! I definitely recommend her custom polishes!)


There you are... sorry this post was 90% NOT China Glaze, oops!

xoxo,
Amanda

Wednesday, October 31, 2012

Halloween Week Part 7: Halloween!

Happy Halloween!! This is my favorite holiday so I'm pretty stoked for today. I am handing out candy at my boyfriend's house so I'm fairly excited for that. Enjoy trick-or-treating! (Fun fact: there are no documented cases of strangers poisoning or putting razor blades in candy, only by parents... oddly enough.)

So the holiday called for something special: My first gradient! Megan sent me some cosmetic sponges in a swap, so I decided to use those and make something epic. And, um, I was close? Here's the colors I picked (the wand is my Migi pens, which unscrew to be normal, one coater polish!):

OPI Atomic Orange, OPI Funky Dunkey, and Migi nail art pens.
My base was plain white and I made a gradient going from white, orange, purple, to black, and I was mostly successful except the black didn't come out very much, and where it did... it stained my cuticles omg. I really liked the subtle effect though, it was really cool and I wish I had a good up-close shot to show you how it came out! (Although, if you're really curious, you could just enlarge the photos...)


And there you have it! Happy Haunting, Ghouls!

xoxo,
Amanda

Sunday, October 28, 2012

Halloween Week Part 4

Hey all! Getting closer and closer to Halloween and since it's Sunday, it's officially Halloween week! What are you and/or your kids dressing up as? I was a zebra for my friend's party last weekend and I was going to be a dinosaur last night, but I got sick and had to cancel my party :(

Lazy Sunday is accurate in depicting this mani. I was SUPER lazy at this. Basically, I did a base of white (this is Sinful Colors, whatever their white is called) and added Pumpkin bar glitter.


Then, because I loved Tangled in my Web from Wet n Wild on day 1, I added that. Voila!


Here's a close-up of my favorite finger. I don't know why, my ring is ALWAYS my favorite and always comes out perfect. Do you have a favorite finger?


xoxo,
Amanda

Saturday, December 10, 2011

I'm Not a Nail Artist... Part Two

Hi, I'm back! More nail art! Hopefully you all haven't lost faith in me after the last attempt :/ This one came out much better, but was much simpler. I decided to go for wrapping paper nails. Each nail is themed differently, but I think that made it even more fun! Behold:


For this I used base coats of a basic white, Ulta The Jungle Look, Cult Nails Iconic, and Orly Sweet Peacock. Then I added green and red polka dots on the white, a red bow on the green, green swirls on the red, and silver ribbon on the blue.


This was pretty simple and I liked it a lot! My favorite were the polka dots, they were just so cute! I wish I had done the bow facing out but hindsight is 20/20. Which nail is your favorite?

xoxo,
Amanda

Thursday, December 8, 2011

I'm Not a Nail Artist... Part One

Hi gals! Today starts a series of nail art I'm, um, attempting. I decided practice makes perfect and blah blah blah but anyway, I wanted to do some Christmas nail art that perhaps you guys could be inspired by and do better than me. So here we go- part one! I had this idea like enlightenment: it came to me, I thought I was genius... and then found out it's been done a million times before. Oh well, here's my take on Christmas lights.

I started off with a basic white creme and added Orly Winter Wonderland to make some sparkle. Then I used my Migi Nail art pens to make green squiggles, and then the nail art pens in corresponding light colors for the bulbs. These pictures are pre-top coat which is good, since I smudged the heck out of it.

(Remember, I'M NOT A PROFESSIONAL. I don't do nail art very often. Please don't judge me for how poorly this turned out; the concept was so much prettier in my mind.)


Here's a close up of my favorite nail, which is what I wanted the entire concept to turn out like (sorry the picture is fuzzy, my macro wasn't cooperating):


Anyway, it was really simple, and with some practice I'm sure I could do this concept justice. There's lots of other people out there who have done this, so check theirs out too if you need further inspiration!

xoxo,
Amanda

Friday, October 21, 2011

Quick Comparison: China Glaze White Cap vs Orly Winter Wonderland

Hey hey hey! How is everyone out there in the interwebz?! It's Friday, which is always great anyway but my one client of the day canceled - so I'm pretty pumped to have the day off now! :) Today's post is a quick comparison. I recently bought China Glaze White Cap, thinking it might be a backup bottle for Orly Winter Wonderland, which happens to be one of my favorite polishes for lightening up or refreshing a mani. Here they are layered over a black creme, in front of their respective bottles:


Immediately you can see that, nope, they are totally different (well, to a nail polish addict; my boyfriend thought they were comparable). ChG is much more sheer than Orly, and Orly pretty much takes over the scene. (What an attention whore!)

Bottle shots; Orly has much larger chunks of glitter, it seems


And up close, you can really see the difference: ChG has a golden glow whereas Orly is all silver. I prefer Orly, but that's because I prefer silver; but both are pretty! Which do you like?

xoxo,
Amanda

Thursday, September 29, 2011

Guest Post: Lisa from Happy Nails

Hi everyone! This post is going to be coming to you straight from across the pond (unless you're reading this in Europe or not in North America, I guess) with my friend Lisa from Happy Nails! Enjoy!


Hello everyone!

My name’s Lisa and my blog is Happy Nails ( http://happynailsuk.blogspot.com/ ).  I’m a UK polisher, brand new to blogging but firmly addicted to colour and sparkle.  I am so happy to be guest posting!

In my post I’ll show you polish from one of my favourite UK brands, 17 by Boots.  I love it because a) it’s cheap, and b) it has a really vibrant range of colours.  I will be painting my nails blue with a cheeky bit of nail art thrown in at the end ;-)

These are the polishes I’ll be using:

On the left we have the lovely Ruby Gem, a rich and creamy crimson; in the middle, Mini Skirt, a bright solid white; and, on the right, the polish I’ll be mainly painting with here: True Blue, a solid, fairly dark primary blue.

After a base coat of Sally Hansen’s Double Duty (I only bought this a couple of days ago so can’t give a full opinion, but it’s worked really well for me so far), I painted 2 coats of True Blue.  I think it’s a fab ‘wardrobe staple’ colour but it is noticeably darker on the nail than it is in the bottle, as you can see in my pic:

 (Excuse my messy painting!  It’ll be evened out just fine in the top coat.)

After being patient for once and letting my nails dry fully, I got painting on my ring finger with Mini Skirt and then Ruby Gem, borrowing the skinny brush from a nail art polish for the details.  And this is what I ended up with...


A patriotic salute from the UK blogger!  *‘God Save the Queen’ plays in the background*

The above Union Jack flag is about as steady as my hand can get, and so I’m fairly proud!  The sparkle on the rest of my nails is from a prized polish in my collection, INM’s Northern Lights silver holo glitter top coat.  Here it is:


I ordered this online as holos are seemingly nonexistent in UK shops (especially if you live in the dreary North-East of England like I do!).  As a sparkle addict this polish drives me wild; holos are like catnip to me!  On this Union Jack mani it represents the most British of institutions... rain XD

Here I will wave goodbye with my nails sparkling.  Thanks so much Amanda for letting me post!

Hugs,
Lisa from Happy Nails xx

Ahh, it feels so British in here ;) Thank you for the lovely post, Lisa! I really have to start practicing my freehand nail art!

xoxo,
Amanda

Tuesday, July 5, 2011

July 4th Mani

Hey ladies! As promised, here's what I really ended up wearing for July 4th/Independence Day. I started off alternating between red, white, and blue (OPI Red Dazzle, Pure Ice Super Star, and Ulta Blue Streak). I put the blue on my pinky only (since the American flag only has a small amount of blue, after all), then red on the ring and pointer, and white on the middle and thumb. (Warning: the picture below is with no cleanup yet, I wasn't done! Please be forgiving of my white messiness!)


Then I added some star shaped nail sprinkles, which you may remember from one of my first posts, to the white fingers (the white looked really stark against the red and blue and kind of boring). I store these by color in a pill organizer I bought at a local drug store.


And here is what resulted! I randomly added two each of blue, red, and iridescent stars to my thumb and middle finger. The iridescent stars look kind of pink in the picture, but in real life they were more clear.


Here's the middle and ring finger for detail. You can see the stars lift up a little off the surface, which is kind of annoying as they sometimes chip off. It's a good thing I only needed this mani to last for one BBQ because it wasn't going to make it much longer! For future reference, I would have placed them more deliberately on flatter areas of my nail and secured them with nail glue, but this was just a quick fix for my disaster mani earlier in the day. I also wanted you all to see Red Dazzle as I don't see it very often and it is by far my favorite red (and I don't really like reds). My camera is giving it kind of an orange tone, but in real life it's bright red.


What do you think? Did I do better my second time around? I loved this mani once I had it on. It's too bad Captain America isn't out for a few weeks, because it would have worked perfectly for that movie as well!

xoxo,
Amanda

Monday, July 4, 2011

51st post: 4th of July Mani, Take One

Happy 4th of July, fellow Americans :) Hope you enjoyed the long weekend. And for all my international readers, how was your Monday? Tonight I'm going to show you my first take on my Independence Day mani, which was a complete failure, in my mind.

Let me start with my vision: red and white stripes with blue crackle over it. Then I decided I needed a blue on the base too with the crackle over it. So I started with a nail wheel experimenting with different colors and decided on OPI Red Dazzle (best red ever, hands down... a major dusty, but it's a beautiful, vibrant red with red glitter), Ulta Blue Streak (I know I've used this about a million times now, but it was perfect!), and Pure Ice Super Star (white) with OPI Turquoise Shatter on top. I tried using horizontal stripes, vertical, diagonal... all to see which one worked best with the crackle. On the wheel, it seemed diagonal stripes of blue, white, and red with the crackle applied vertically worked best. But on the nail: nope. It was just a gross, misguided mess. The Turquoise blended into the blue, the red clashed with the turquoise... yuck. Well, here you go, if you must see. It's not a sight I'm proud of.


Sigh. You only get one finger because cleanup was a beast (3 types of polishes, multiple coats, weird angles... you get the idea). This is the finger that came out the best, and I'm not sure why there's a shadow in the picture because it didn't show up on my camera *shrugs*. On the bright side, I loved Turquoise Shatter over white so that may become an option later on?

So what do you ladies think of this mani? I ended up taking it off immediately and I switched to another 4th mani... but I'll show you that tomorrow. :)

xoxo,
Amanda

Monday, February 21, 2011

China Glaze Crackle!

Hello again! As you can see, I use the weekends to catch up and this long weekend was perfect because I got China Glaze Crackles in and I couldn't WAIT to show you guys! I swatched each shade (yes, I got all 6) on a nail wheel over two different colors to show some diversity of what you can do and I think I was inspired for my next mani!

First up are the three "basic" colors: white (Lightning Bolt), gray (Cracked Concrete - whoops, called it Cracked Pavement in my last post!), and black (Black Mesh). I decided to show these over colors to highlight what they can do. Here they are over Petites Figi (for you researchers or people who had to take a research class, you might notice I used a "convenience sample" of my revently used polishes for these swatches).


Secondly, I layered them all over Revlon Rock. (Sorry, the right side is coming out dark for some reason. It looks fine on my camera but on my computer they came out dark?)


Next I used the three colored crackles: pink (Broken Hearted), blue (Crushed Candy), and purple (Fault Line). The first picture shows them layered over Finger Paints Easel Come, Easel Go, a really nice, bright silver:


And in other strange things my computer is doing news, this picture is rotated and I can't get it back... mostly because Blogspot tilted it so I can't fix it! But anyway, here they are over Sinful Colors Show Me White.


So what do you guys think? I personally love them, but know they aren't for everybody or every setting. I'm going to wear them today to play around with and maybe when I'm in class but they will have to come off for work! Which ones did you like most, which color combinations worked best, and are you getting this collection?

xoxo,
Amanda